All of my cutting file shares are free. Please do not redistribute or sell what I freely share. These cutting file shares are for personal use only.

Please be fair and give credit where credit is due, in turn, I will always make an effort to give credit to my resources and link them appropriately. Thank you for your consideration.

Friday, May 31, 2013

June's Cutting Files Are Here

Good day or evening everyone. In my earlier posts I mentioned, I would try to make a set of cutting files and share a set each month in order to help increase donations. As many of you already know, I am always happy to share the cutting files I make and will continue to share. Each month, as long as time, family matters, and the good Lord permits I'll continue to make files for donations on a monthly basis and will continue to share cutting files throughout the month for all to enjoy.

** To see all of the individual cutting file sets and instructions you'll need to scroll down a lot. For one thing, I chat too much. :)


There are 4 sets of cutting files for this month's donors. Each of the files has been test cut, assembled, and converted into three cutting formats like, .svg, .dxf, and Studio. Each file also has a picture of the finished project.

I was recently asked to join a design team to start selling my files. I thought and prayed about about it. By posting this today you already know my answer. I would love to earn the extra income but not as much as I enjoy sharing.

 Helping others and sharing little things like these cutting files is my blessing. I appreciate any and all donations as it helps me to have funds on hand for those little crafty things we all go through like crazy. I'm also saving for a new computer. My dear old computer has seen better days. Just about all of the keys no longer have letters on them, it's doing all kinds of crazy things but it's hanging on....lol. I must admit to giving it a few mean words. This seems to help...lol Oh, I forgot to add, the "zero number key" has popped out and I can't get it to go back into place. Yes, it's a real gem. I shouldn't say too many mean things about it, I'm fortunate to have a computer.

If you would like to send a donation. I would very much appreciate your kindness and enjoy sending you this set of cutting files. Below are pictures of the cutting files and I'll explain in some detail the assembly for each one.I almost forgot to add; If you send a donation please add to the message area "June" this way I will know you are wanting these files.


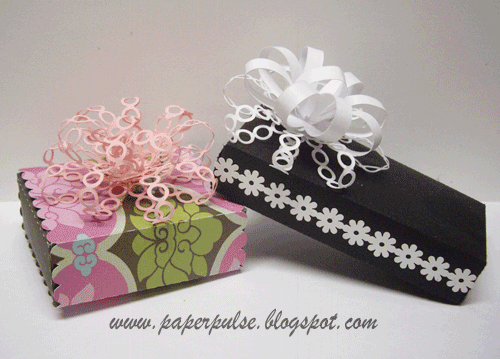
Cutting File 1: Surprise Box of Surprises

The cutting file below is easy to assemble. You only need to cut two of the outer parts of the box, glue one end to the other and make sure to leave it open. The lid is what holds it closed. The cutting file includes a beautiful frame and border to decorate with. The finished box will measure 8.5 x4. The bow is not part of the cutting file but it's easy to make. I just cut five strips of 1.5 x 11 inch strips of paper, ran them through a crimper, slightly bent so the strips would meet in the center and added a dab of glue to hold the centers down. Next, I criss-crossed the five folded strips adding glue to each layer to make the bow.


Cutting File 2: Accordion Photo Frame Card

This cute little frame card can be made as large as you want. I try to make all of my cutting files to fit a letter size piece of card stock. You cut out the card ( Accordion Frame Base) then bring your photos into Studio and size them to fit into the rectangles I made for the photos to be placed. After everything is cut out all you have to do next is glue the photos behind the frames they fit in then add the easel to the back. This Accordion Photo Frame Card folds nice and flat for mailing.


Cutting File Set 3: Pop Up Box Card with Secret Message Tag
This is another file easy to assemble. It includes the cupcake, pennant, borders, leaves, flowers, and the zipped secret message tag. All you need to do to assemble this is to do a Print and Cut of the Zipped Secret Message Tag and pennant. Make sure to place enough adhesive around the zipped area so when the recipient pulls on the tab it will easily reveal their hidden message.If it's not glued well enough around the zipped area it won't open easily.

Next, fold the box part on the perforated areas. The two piece which will meet in the center on the bottom need to be glued on the three outer edges leaving the center open. I did it this way so I could place the tag through the slit and then into the opening to better hold the tag into place. Since I forgot to photo it from the side I drew a picture of what the side should look like. The pink is the tag.

Last, cut out the pieces of your cupcake in your choice of colors, add the pennant to the top, assemble your flowers or use other embellishments of you choosing and your card is done. The second photo of this card shows how nicely flat it folds for mailing.

Drawing of Card Box Side


Cutting File 4: Babushka Doll Card

I drew this little cutie in Studio and set it all up to be a card. The little Babushka Doll was Printed and Cut then adhered to the card. The smaller blank doll shape is for adding a sentiment. If you use this to place a sentiment inside your card make sure you print and cut it with the Babushka Doll to save time and paper. Also, don't forget to set your type to "No Cut". I've only done this...well....way too many times...lol. Do as I say and not as I do....hee, hee. 


Wednesday, May 29, 2013

Strawberry Mini Basket and Jo's Challenge Share

This cute little basket will come in handy for a lot of things like decoration and gift giving. Johann show cased the Strawberry Mini Basket I previously shared here ] by using it for her MazyArt challenge. Her blog is It's My Creative World. She has lots of wonderful inspirations over at her blog so you want to make sure to check it out. It was so kind of Jo to allow me to share her beautiful project here on my blog. As you can see she has some great coloring skills.

I'm going to re-post the file share of the Strawberry Mini Basket. It is now in .svg, .dxf, and Studio format so all cutting machine users can use this cutting file. I designed the strawberry paper in Photoshop then filled the pieces with the paper. If you just want the Strawberry paper you can find it HERE

This cutting file will be easier access through this link. Sadly, you will have to wait until the first of the month. My Box.net has ran out of bandwidth for the month of May but it will be re-set on June 1st. You can download the zipped file with all three formats and an image file ------> HERE

Below are pictures of the lovely challenge project Jo submitted using the Strawberry Mini Basket. Didn't she do a great job. I just love the images she used.


Here is a picture of the Strawberry Mini Basket sample I made to create an image file to go along with the cutting files.


Wednesday, May 22, 2013

Vintage Rocking Horse Boy Card

*** My apologies go out to all of those whom tried to download this cutting file. I just learned I am out of band width again. Box.net will reset it at the first of the month. If this is a file you don't want to wait for, please email me and I will send it directly to you. On the bright side, when I run out of band width it means many are enjoying the cutting files I share but it always makes me feel bad when someone has to wait. Hugs, Debbie


I've been wanting to share this for some time now but haven't had the time to do the conversions so all cutting machine users can use it. Now that it is all set to go, I'm happy to be able to share this adorable vintage card/ place card or decoration. I came across this image while surfing the internet. This image just melted me as it reminded be of being a little girl who ran to the mail box when my Grandma had told us she sent a package. She would always include the most darling cards. They would either do something or sparkle with lots of glitter. The cards and the little Dutch shoe chocolates were always something me and my siblings looked forward to seeing in my Grandma's brown paper packages delivered by the postal carrier. Oh what wonderful and fond memories. The only thing better than getting a package from my Grandma was being able to have her visit us or us visit her. I miss her so very much.

Once I saw this image I grabbed a picture and re-created it in Studio. It took some time but for me it was so well worth the time spent. I hope you enjoy it as much as I do. Once I cut out two of the images using my Print and Cut feature of Studio I cut tow more on a plain red card stock to line the back side of the image. I added glue to the head and face area to glue them back to back then opened up the bottom part to balance the card so it would rock. I still have it sitting out. Every time I go by it I touch the rocker and watch it go back and forth. I know, I'm such a kid....lol.

If you would like to download this Vintage Rocking Card you can grab it -----> HERE The zipped file has the .svg, .dxf, Studio cutting file and the image. Happy Crafting Everyone!


Sunday, May 19, 2013

Making Personalized Bows Tutorial and Free Gift Bow Download

Good day everyone. I would like to share a handy way to make your own cutting files for personalized gift bows. I made a tutorial to help walk you through the easy steps of making some nice little bows. The great thing about being able to do this is you will never have to run to the store at the last minute to purchase a bow which re wish you forgot when you bought the gift and wrapping paper. The other nice thing is you can personalize it.

Before making the tutorial I made some bows and would like to share them with all of you. They are quite lovely. The Looped Base bow leaves a open space in the middle where you can add the Bubble, Simple, or Happy Birthday bow. It's a nice full bow when all put together. It's really a quick project to do. The only problems I had was with my darn Ratchet Blade. I just opened it up two weeks ago and it's already not doing a great job cutting. It was rather frustrating. I love my Cameo but I sure wish they would come up with a blade you can easily replace the blade and not have to cost so much. I know they should last for a while and make lots of cuts. My luck with the Silhouette Ratchet blades has not fared too well. I ruined two blades trying to clean out the housing. I know, it's probably just me. In a way, I miss the old cap blades. I never had any problems with them.Okay, enough of my whining...lol. Time for me to share the bows, tutorial and some pictures.

You can download the Gift Bows ------> HERE They are in .svg, .dxf, and Studio formats. In the tutorial I'm using the Silhouette Designer Edition. I just love this software!


BubBbe and Simple Bow


Looped Base Bow and Happy Birthday Bow


Friday, May 17, 2013

Gum Paste and Cards...huh?

It's such a blessing to have met so many creative people in my life. Through the good things that can come from the internet I've made new friends and cherish each one.

Today, I am honored and thrilled to share three creative projects made with cutting files I shared with two very talented women. The first project is a cake. Inga whom considers herself a n"hobby" baker make this gorgeous cake using a peony flower card cutting file I shared with her. She used her Cricut to cut the gumpaste and arranged each petal to look so perfect and enchanting. the beautiful shimmer of the flower petals was created by using Squire Kitchen metallic gold and copper dust. Inga said after she applied the shimmer she gave it a quick steam to bring out its brilliance.

Next, I have two more cards made by my friend Kim from Scraps of Faith Blog. She has the wonderful talent of being able to compose a card with her flow of ideas. Every card she creates is one of a kind.She never creates more than one. It's like she throws the mold away.

Kim asked me if I would make her a tool box and a crib with a mobile for the two cards shown. I just love to see what she does with the files I make for her. It is such a delight to see what she can do to bring a card to life with her style and creativity.

I feel so blessed when I receive an email from someone whom shares their creations. It doesn't matter if they've used one of my files or not. This is probably why the Gallery over at the Silhouette Plus forum is one of my favorite places to visit. What a place the Gallery is! It is filled with many wonderful creations of people who just want to make beautiful things.

Enjoy these beautiful creations. Now it's time for you to go get creative. I hope you find these as inspiring as I do.

Hugs,
Debbie


Inga's Peony Cake


Kim's Fixer Boy Card


Kim's Baby Steps Card


Tuesday, May 14, 2013

ConGRADulations Cupcake Wrapper


* A little note: I intentionally spelled Congratulations as ConGRADulations to accentuate the occasion. It's a bit of play on the word Congratulations. 

Congratulations to all of the 2013 graduates. I know as we experienced the High School and College graduations in our family a party to celebrate these special occasions was a fun must. To help all of you get ready to celebrate these momentous occasions I made a Congradulations cupcake wrapper to share.

Enjoy your special day as you watch your loved ones walk across that stage and onto a new path. They have grown, learned, and are ready to begin the next adult chapters of their live.

Of course, it wouldn't be me if I didn't share a little story.When my children graduated from High School, I always took their hand and walked them out of the double wide doors of their school. I looked at them with proud tears of joy and say; " I remember the first day I held your hand and walked you into the doors of your Kindergarten school. Today, I'm taking your hand  with love, joy, and pride in my heart as I walk you out of school. I promise I won't hold your hand to walk you into college....lol but, this moment is ours. "

May God bless their paths. Hugs, Debbie

If you don't want the 2013 on the bottom you can un-group this file and delete it. You can cut them in the school colors of your choice. If you can't find the correct cupcake liner color I made a piece you can cut in the correct color. You just have to glue it to the inside.

To download this file in .svg, .dxf, and Studio format click -------> HERE

I really wish I would have had some cupcakes baked to place in this wrapper. Mmmmm.....who doesn't love a tasty cupcake.


Saturday, May 11, 2013

Bee-cause I love to share....Bee Hive Card

Before I blog about the Bee Hive Card I want to thank all of you who've donated to my blog. Your kindness is my muse. You're the ones whom help keep me going and keep many of my cutting files and videos free for everyone to enjoy. Big hugs to all of you whom have supported my efforts and my love for designing.

This card is dedicated to a very special lady who has made me feel beyond appreciated. I will never forget her kindness and support of my love for creating and sharing.

Inspired by my friend Kim from Scraps of Faith blog I decided to use the little PnC bee I shared here on the blog and design my own little bee hive card for him.  I'm sharing it here with all of you bee-cause I know you love to craft and create. I hope it will make your day a little brighter.

This cutting file is in a zipped folder with .svg, .dxf, and Studio formats. I set it up where you can either make a card from it or use it as bee hive for embellishment.

You can download the Bee Hive Card -----> HERE


Friday, May 10, 2013

Super Planet with Superduper Girl and Superduper Boy

Kim Bell from Scraps of Faith Blog has made another super duper card creation. Kim asked me if I cold help her out by making a file that said; "Super Planet" instead of the Superman style which says; "Daily Planet". I was more than happy to help. I just love seeing what she will do with the files I make for her. She did it again! She made the most adorable card. I'm so honored to be able to share it with all of you. As you can see, she is one talented card maker. Please visit her blog for lots of inspiration. She has a recipe for each of her cards. How wonderfully helpful.

Here's a look at her "Super" easel card. She will love to have you stop by her place. Don't forget to leave some blog love for her. :)


Super Duper Card Closed


Super Duper Card Open

Thursday, May 9, 2013

Free Bee Digi Paper

This morning I made some new digital paper to use for a card. Since many of you have downloaded the first bee Print and Cut file I shared I thought you might like to have this digital paper.

I just added this paper to my Silhouette Studio papers. If you have the Silhouette Studio Designer Edition, all you have to do to add new papers to your collections is drag your patterned Digi paper into your" My Patterns folder". You may also be able to do this with the Studio basic version. I can't remember if I was able to do this when I had the basic version. You can also import it to your Library then drag it to your "My Patterns" folder

Once you've added this to you "My Patterns" folder you can go to Advanced Options in your Pattern Fill tool and scale the image up or down. I filled a shape and scaled it up to show you.

If you would like this digi paper, you can download it -----> HERE


Print and Cut File Shares

Good day everyone. I finally got the chance to convert all of the Print and Cut files seen below. They are all in one zipped folder. You can delete any of them you don't like or wouldn't use. It was easier to place them all in one file than  have many links to each one. All of the files are in .svg,.dxf, and Studio.

If you would like to have these, you can download them ----> HERE

I hope all of you have had the chance to make some of your very own designs. If you did, I would love to see them.I bet you did a great job. :)

Have a wonderful day of crafting and creating. 

Monday, May 6, 2013

Glass Look, Design Tutorials, and More

Good Monday everyone. This week has kept me hopping busy with my precious grandchildren. We've had loads of fun and lots of activities which I would love to share real soon. School will be out soon and children will love doing some of the things we did this week. Right now, I want to make sure to share some videos on designing with Studio.

The first video is on designing cutting files that can be made into cards as well as print and cut images. After I made this video, one of my YouTube subscribers wrote to me in a comment asking if I could make a video about making images to look like glass. I made several samples I will share but first, I want everyone to see if they can design their own images and glass look images.

Later, when I have the time, I'll convert these to .dxf and .svg files then make sure to share them for anyone who would like to have them.

I have a cat named Qunicy. We named him Quincy because he is the most caring, lovable cat a family could have as a part of their family. He cuddles with our two dogs and never seems to mind that he is out numbered. He takes really good care of out two other fur babies because he likes to groom them. He is sort of like a little doctor. So, he is named after the old show about Dr. Quicncy. too much of a story but sometimes I'm moved to share....lol.

Each one of these files were created in Studio. I cut them on photo paper.Below are the videos. You can always click on them to go to my YouTube channel to get a bigger view.

The first picture is a set of glass look images drawn in Studio. I forgot to cut the lid to the jar on the far right. The second and third picture show a few of the images drawn in Studio. I've shared a print and cut bee in an earlier post but this time I wanted to make a reading bee. He has little glasses on and a book he can hold. The sweet little bird was inspired by a small metal sculpture my husband brought home to me last week. He knew I would love it and I did. So much I had to draw her. The last two images are the Umbrella Baby Arrival and a Lace fan. The baby umbrella arrival will be used for baby shower cards.I think they'll look really sweet.


Wednesday, May 1, 2013

7 Card Cutting Files, One Donation

I've been busy making more cutting files in hopes of increasing the donations which are not too many but, I still enjoy making and sharing creative things.

This time around, there are 7 card cutting files for anyone making a donation. All you have to do is type 7 Cards in the area provided for "purpose". This way I'll make sure to send you the two from last month and the additional 5 cutting files. All of the files are in .svg, .dxf, and Studio formats. They also include pictures.

I'm not setting any donation minimum as I want everyone to be able to afford them and pay only what they can afford. I know many of us are on fixed incomes and I would hate to think anyone is losing out. If you are on a very limited income, please send me an email so I can make sure you get them without having to make a donation and please don't feel bad for asking; many of us have all been in circumstances where there wasn't any extra to spare for fun stuff.

Below are pictures of the additional 5 card cutting files you will receive.The other two are the Flower Pop Up card and The Window Card file.


Below is the Shadow Box Card which includes the Border


Below are 3 Pictures of the Concertina Card using the Home Sweet Home Print and cut Shared here on my blog


Below are two pictures of the Zipped Secret Message Card You can type the message you want to appear, then do a print and cut. Glue or adhere the edges above and below the zipper area so when the recipient opens it it will open like a zipper.


Below are two images of the Tri- Fold Tag Card


Below is the image of the 3D cake card file